Showing variables and scores to viewers
You now have the power to show variable values back to your users throughout their viewing experience!
With Stornaway’s advanced game logic, you can keep track of scores, adjust character relationships or manage inventories from within your project. By setting up variables, you can store change and check these values, tailoring a user journey through branching scenarios.
Some times it’s more valuable to show user progress during their interactive learning; whether this is a quiz or scenario questionnaire, feeding back their correct / incorrect results after each question answered will keep engagement high and viewers invested in their experience.
Watch our tutorial video 🎓
See it in action 🎬
A simple mathematics quiz recording and reporting current user scores back to them.
Interactive questionnaire on packing for your holiday.
How the magic happens 🪄
STEP 1: Familiarise yourself with our advanced game logic. 🎮
To show variable values on screen, you’ll need to have some knowledge about setting up variables and adjusting these values across your project. Find out more by heading over to the help page or watch our tutorial video below.
STEP 2: Create your variables. ✏️
When setting up your Stornaway project, create the variables you’ll be looking to change across your viewers’ journey. This could be something as simple as scoring with numbers, passed or failed variable, or something more complex like an inventory system.
Please note, you should name your variables without capitals or spaces – use lowercase and hyphens instead!
STEP 3: Adjust behaviours across your islands 🎲
Now it’s time to change the values of these variables across the interactions – noting where a user answered a question correctly and increasing their score by one, for example. You can use ‘add up, change and set’ to change its value when the viewer makes a choice.
A more detailed breakdown on how to do this is explained in our FAQs below.
STEP 3: Add shortcodes on your onscreen elements 🧑🏾💻
Variable values can currently be used in your choices, onscreen question or island name/description, so it’s time to decide where you want to place this information. We like using a choice with custom buttons positions, so we can place this anywhere on the screen and change its size.
Within your chosen element, you just need to use a shortcode with your variable name in. For example [variable-score] where score is the name of the variable I have set up.
You can also include other text around it:
- Your current score is [variable-score]
- You have picked up the [variable-inventory-item]
- Hello [variable-name], it’s great to meet you
The possibilities are endless!
Frequently Asked Questions 🤔
How to use Scores/Variables
Scores/Variables are key to creating game logic and recording user progress. They are any unit of information stored in a project with a value that may change over the course of the story.
For example, you can create one and call it ‘Points’. Then when a viewer makes a choice, you can use the new Game Settings panel for each island to make increase or decrease the Points by any amount, or set it to a specific number, and ultimately decide the path that the viewer should follow depending on how many Points they have.
There are three variable types available to be used across your project:
- Number (for example keeping track of points or relationship scores)
- Text (using words to record actions, e.g. setting a value to record whether someone chose Tea, Coffee or Hot Chocolate)
- Boolean (a true / false flag that can be used for item collection and statuses)
You can use, one or a combination of all of them to get your story just right!
To read more about our advanced game logic, you can read more here.
How to set and change Scores/Variables
There are three options for setting and changing variables which can be confusing at first sight.
Once you’ve created a score/ variable, you can use ‘add up, change and set’ to change its value when the viewer makes a choice.
The most common of these are “set” which allows you to set a specific value- e.g. a number or a piece of text- and “change” which allows you to increase or decrease a score by the amount that you specify.
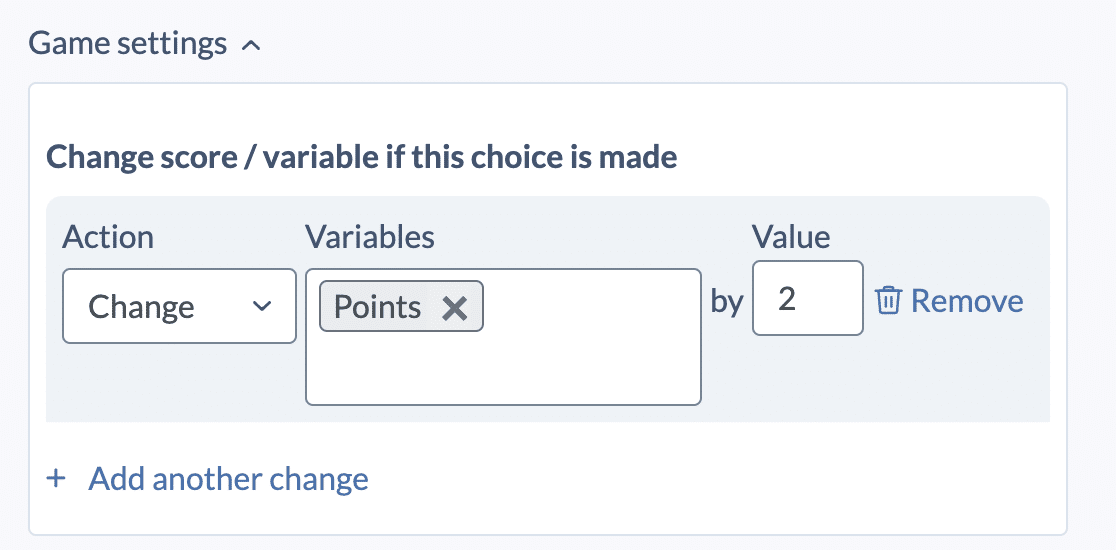
For example, if you’ve created a variable labelled ‘points’, starting at zero, you can use the ‘change’ setting to add 1, 2 or however many points you want- or subtract by entering -1, -2 etc. This is most often used in quizzes where one choice will not get any points, another will get one point and another will get two points. Just add the “change” setting illustrated below to each choice.
“Set” is most often used to set a score/variable to true or false, but it can also be used to set it to a number or a piece of text. The type of score/variable is set in the Settings > Scores/Variables page where you create and edit them.
“Add up” is less commonly used, but it allows you to combine the values of two different scores.
After you have changed the values of the scores, you can then use the if/else game logic to route people’s journeys according to the value of the scores- e.g. if they’ve got 0 points, they go to the ‘you’ve lost’ island. Or, if they’ve got more than 20 points, they go to the ‘you’ve got full marks’ island.
If you need more help with game settings, contact support via email at support@stornaway.io

How to branch viewers depending on Score/Variable values
When you have created and assigned all your variables across your story, an exciting part of this is to route your viewers down specific paths depending on what and how variables have changed across their experience.
At the simplest level, if a viewer has completed a quiz and the ‘score’ variable is now ‘≤5’, you can link them to one island for a ‘low’ results. If they scored ‘>5’, you can link them to a ‘high’ result, creating different experiences dependant on the viewer’s end score.
Another example is when using the boolean (true / false) variable and linking viewers to variations in the story. If the variable “John alive” is true, you can link to a scene with John, but if “John alive” has been changed to false during the viewer’s play through, you can link to a scene without John.

